By: Kathy Trainor
Believe it or not, worm tanks are more common then you think. For a while I thought I was the only mommy blogger who made them, but I was pleasantly surprised to find out that fellow Signature Moms blogger, Martianne, was also working on a worm tank with her children. I use them for my garden each school year to start a Pizza Garden in my classroom. Some people are grossed out by worms. The idea of having a worm tank is something rather unsanitary to them, but in reality, these little wiggling worms can save you time and money.
How to make a worm tank
You need:
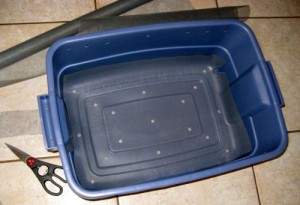
- One 8-10 gallon plastic storage boxes Cost: about $5 each
- Drill (with 1/4″ and 1/16″ bits) for making drainage & ventilation holes
- Newspaper
- About one pound of worms
Putting together your worm tank:
Step 1
Drill about twenty evenly spaced 1/4 inch holes in the bottom of each bin. These holes will provide drainage and ventilation for the worms to move and grow. Make sure to do the top cover and sides evenly
Step 2
Prepare bedding for the worms by shredding newspaper into 1 inch strips. Worms need bedding that is moist. Moisten the newspaper by soaking it in water and then squeezing out the excess water. Cover the bottom of the bin with 3-4 inches of moist newspaper, fluffed up. You will then want to take 3-4 large scoops of dirt or potting soil and place it on the newspaper.
Step 3
Add your worms to the bedding. One way to gather red worms, is to put out a large piece of wet cardboard on your lawn or garden at night. If that doesn’t you may want to buy some here.
Step 4
Cut a piece of cardboard to fit over the bedding and get it wet. Then cover the bedding with the cardboard. (Worms love cardboard, and it breaks down within months.) This also keeps things moist and makes it easy to tend to. At this point, add coffee grounds to prevent a damp odor or moldy smell from developing in your worm tank.
Step 5
Place your bin in a well-ventilated area. Places like a laundry room, garage, balcony, under the kitchen sink, or outside in the shade all work well. You can use the lid of a second bin as a tray to catch any moisture that may drain from the bin if you want.
Step 6
Feed your worms slowly at first. As the worms multiply, you can begin to add more food. Gently bury the food in a different section of the bin each week, under the cardboard. The worms will follow the food scraps around the bin. This will give them exercise and allow them to move as they do in the environment. This will also prevent odor.

What do worms like to eat? These are the items you should put in your Worm Tanks.
|
Worms LOVE |
Worms HATE |
|
-Breads |
-Dairy Products |
Should you run into problems with your worm tank…
Troubleshooting
|
Problem |
Cause |
Solution |
|
Worms are dying |
-Too wet |
-Add more bedding |
|
Bin stinks |
-Not enough air |
-Do not feed for 1-2 weeks |
Good luck!
